How To 3d Print Solar Panels The cost of solar panels has plummeted in recent years. The average price for a home-sized system is now around $8 per watt, down from $10 to $12 just two years ago. But there’s still one big problem: the need to buy and install them on your roof. And that typically requires hiring an electrician or contractor with specialized training who can navigate all the regulations involved in getting approval from your local building inspector. Fortunately, 3D printing technology may soon make it possible for you to print your own solar panels at home inexpensively and without any special permissions required!
Related:
- Top 7 Best Dual Extruder 3d Printer Under $500
- Top 7 Best Filament For Lithophanes
- 7 Best Hairspray For 3d Printing
- Top 7 Best Direct Drive Extruder
- Top 7 Best Resin For 3d Printer
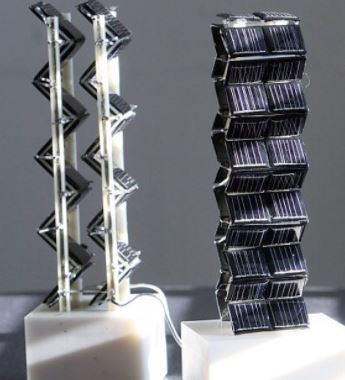
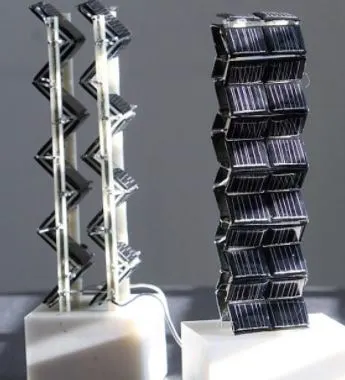
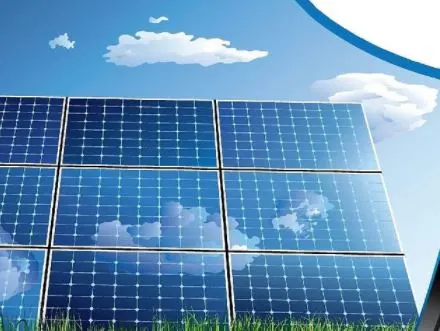
How to 3d print solar panels? (printed solar cell)
3D printing is becoming more and more mainstream, but there are still many limitations with current 3D printers. One of the main issues is that high precision parts, such as solar panels, require a lot of maintenance to ensure good print quality. Even when the printer itself has a very high resolution it can be impossible to get consistent results due to minute changes in temperature or humidity for instance.
Therefore scientists from the Fraunhofer Institute for Silicate Research ISC Konstanz have been working on a method known as “direct ink writing”.
In this case, they use a standard DLP projector instead of an expensive laser scanner and direct UV-light through a mask which only lets the UV light go where it should. With this technology almost any object can be reproduced, the only limits are the size of the projector and the workspace.
An interesting aspect of this technology is that it does not limit you to a single material.
In fact, polymer-based materials such as acrylic glass or epoxy resin have been used in large quantities for rapid prototyping for years now. However, metal has also been used before by other groups who focused on 3D printing with metal instead of plastic.
For solar panels, there might be some issues regarding their performance compared to traditional methods but certainly being able to produce your own solar panels will save a lot of money!
So what do you think? Will this become a good alternative for mass production? Or will it remain an expensive “toy” for people who need unusually large parts?
How To 3d Print Solar Panels? (cre: sculpteo)
How can I make solar cells at home? Solar Panel Printing Printer
If you want to make some low voltage current using solar cell at home using simple materials like Copper Foil (CuFoil), P.V.C sheets, thin black sheet called Aluminized Mylar, a piece of Plexiglass or even a CDrom disc!
Step1: Get the materials from the shop
In this experiment, we need the following items. If you have none, get them from the shops.
– A sheet of 1mm Copper Foil (CuFoil) [Around INR 30 per sq ft]
– A sheet of Aluminized Mylar [around INR 120 for a 4′ x 6′]
– One Plexiglass [INR 100 ]
– One CD Rom Scratch-free [INR 10 onwards depending on type] You can use any optical grade available material like Lexan, Pyrex, etc.. but they are expensive and not so easy to work with. Also, take a small Plexiglass sheet.

How To 3d Print Solar Panels? (cre: greenoptimistic)
Step2: Making copper foil
Take a piece of CuFoil paper and cut it to size (12″x12″). Now take electric tape (Scotch adhesive) and stick the Copper Foil on the surface {you can use any adhesive which sticks well to both CuFoil and Plexiglass} Remember do not use glue. It will destroy the CuFoil instead make sure that you get an adhesive like P.V.C, Contact Adhesive, etc.
Now cut the ACID PAD with the same size along with a 1mm strip of Acide Pad [around 2″x2″] Take some paste made out of baking soda or kitchen salt dissolve in water to make a paste. Now paint the area of 1″x1″ of a foil with paste and let it dry properly. In meantime connect a 9v PP3 battery to a small ammeter (MAKE SURE THE METER IS INSIDE THE CIRCUIT)
Now take a 2″x2″ Acide pad strip and make some cuts on one side as shown below. Connect the leads of acide pad strip to each other using wire or tape. Make sure that there is no metal contact between leads {we do not want any short circuit}. The copper foiled area should be connected directly to the positive terminal of the battery only through the Acide Strip.
Make sure that you have covered all your Plexiglass sheet with some adhesive so that it does not move at all. Now place the Copper Foil on the Plexiglass sheet, connect to the battery and observe the current reading on the meter. The current should be around 20-25mA. If you get more than say 100mA then that means you have to recheck your connections or maybe a faulty Acide strip.
that’s it now your 1st CuFoil solar cell is ready 🙂
How To 3d Print Solar Panels? (cre: 3dprint)
Step3: Making 3rd Cu foil solar cell – Create solar panels
Take 2 1/2″ x 2 1/2 ” strip of Aluminized Mylar paper {or any other insulating material}. Cut about 8 pieces of the same size as shown. Now stick these sheets directly on top of each other using EVA adhesive or anything which sticks well on both surfaces.
Now cut the area of 1″x1″ as shown in the figure and coat it with baking soda solution. Let it dry properly
Now take a single CuFoil and bend to form a “J” shape as shown below. Make sure that you have to connect one side {base} whereas the other is an open end. This will be your third solar cell.
Now paint this newly made j -shaped acid foil from the base only with baking soda paste and let it dry completely.
In the meantime charge up a small 9v battery using any source. Connect the leads of the acid foil strip directly to each other by winding them around each other, make sure no metal contact between leads {no short circuit}. Now connect the 3rd CuFoil Solar Cell with a little bend to 9v battery and observe the current reading on the ammeter.
The current should be around 100-120mA. If you get less than this, try increasing temperature using a hairdryer or place the cell in direct sunlight for a few minutes.
Now take one piece of plexiglass and cut it to size 12″ x 12″ and coat EVA adhesive on both sides. Place the 3rd CuFoil solar cell with a curve facing downwards and cover it with a plexiglass sheet by pasting all 4 edges. Paste the Plexiglass sheet from the backside also so that no light escapes from the covered area. Now your 3rd Cu foil solar cell is ready.
Conclusion – Green energy technology manufacturing
If you are looking for a cost-effective way to produce solar panels, 3D printing may be the answer. With 3D printing, companies can make intricate designs that would otherwise be too expensive or time-consuming with traditional manufacturing methods.
This article has provided some great information about how your company could save money and protect our environment by using this innovative technology. Have you considered any other ways you can incorporate 3d print in your business?
Further Reading:
- Top 7 Best 3d Printer For Board Games
- Top 7 Best Creality 3d Printers
- 7 Best Filaments For Ender 3
- Top 7 Best 3d Printer For Nylon
- Top 7 Best 3D Printer For Cosplay Armor
Tags: #Petg #Tpu #Abs #Supports #Panels #Pause #Kidney #Lower #Speed #Creep #Quality #Adhesion #Monoprice #Filament #Firmware #Bed
Tags: printed, solar, solar panel, printed solar cells, print solar cells, renewable energy transition, market insights powering, embedded youtube video, youtube video session, paul hanaphy january, video session html, traditional solar panels, efficient solar panels, printed solar panels, energy, power, read, solar power, devices, additive manufacturing, innovation, days, december, solar energy, order, additive, news, university