As 3D printing technology advances, drones are being printed more and more. This blog post will focus on the pros and cons of how to 3d print a drone, as well as some tips for where to buy them.
The benefits of using a 3D printer are that you can make custom designs depending on what your needs are.
You can also modify or fix existing designs if something is broken or not working properly. There is no need for any specialized skill set which makes it easy for anyone to use this new technology with ease.
Related:
- Top 7 Best Dual Extruder 3d Printer Under $500
- Top 7 Best Filament For Lithophanes
- 7 Best Hairspray For 3d Printing
- Top 7 Best Direct Drive Extruder
- Top 7 Best Resin For 3d Printer
How to 3d print a drone? (printable drone frames)
Yes, you can 3D print a drone but you should find some info before practicing.
Tom is an award-winning designer with over 10 years of experience in designing for the international automotive industry, working for clients such as Jaguar Land Rover and Bentley Motorsport. Since leaving full-time employment to form his own studio in 2011, Tom has been developing a diverse range of projects from furniture and lighting to architectural graphics and exhibition stands.
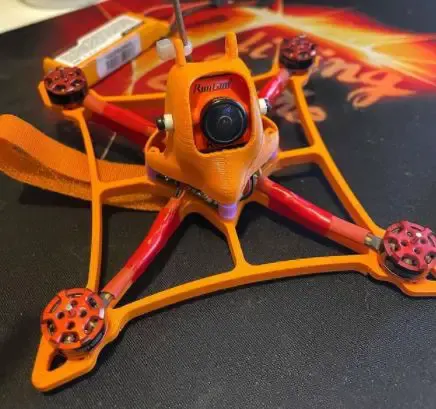
The drone is printed with Ultimaker 2+ plastic extruder 3d printer.
The size is 500mm in diagonal with 5 shells and 100-micron resolution in gray PLA filament. The weight of the prototype is 36 grams, and it’s about 50mm in diameter.
The project targets at 3D Printing Drone as a Maker Challenge because Tom believes that everyone should have access to this technology so they can create their own worlds – ‘I believe we are living in a world where we all want to be making things – we need to create or we wither and die.
3D printing is a technology that can help everyone unleash their creativity so I wanted to design an object that would allow people to experience the magic of making things for themselves.”
Tom says, “My goal with this project was to give people the chance to own a drone without having to pay the high prices charged by commercial drone companies. I believe that this technology should be available for everyone.” The primary goal of Tom and his team is to allow as many people as possible to experience the magic of making things for themselves.


How To 3d Print a Drone?
How to build your own 3D printed quadcopter drone? (Foldable brushed micro-quad)
An editable DIY Drone Kit and build instructions for a 3D printed quadcopter. This article provides all the necessary information to order, 3D print, and build your own drone. When you build this drone, you’ll learn how drones work and find out what makes them fly. You can make these parts with very basic equipment such as a hand drill, soldering iron, or a 3D printer.
This project is called Tinker Drone because you can modify it without limits. You don’t need to buy new parts, you can make them yourself with some basic equipment (see below).
Tinker Drone is a very stable flyer and it performs like real drones costing hundreds of dollars. And the best part of Tinker Drone is that you build it by yourself.
With Tinker Drone, you can learn how drones work and improve your drone building skills (DIY knowledge). You’ll also learn about basic parts of the drones like motors, batteries, ESCs, radio receivers, etc. First, let me tell you a little bit about the history of this project.
History of Tinker Drone
Project Tinker drone started in August 2015 when I needed a stable flyer to teach my kids how drones work. After several hours of research on the internet, I realized that there’s no simple solution for this task. Most of the drones that you can buy (for a reasonable price) were way too expensive, fragile, and complicated to use.
They fly for a few minutes at best. So I decided that if I can’t buy anything, then I’ll build my own simple drone from scratch.
After several weeks of research, I had some good ideas about how drones work and what parts you need to build a stable quadcopter. In the meantime, my friend Simon encouraged me to let other people know about this project on blogs or YouTube channels because it’s very useful for beginners or students who want to learn more about building their own DIY drones.
He also advised me a bunch of online services which helped a lot with promotion (3D hubs, 3D print services, etc). We created the Tinker Drone website where you can find all the necessary information.
I ordered my parts from HobbyKing.com, some of them were defective but I managed to build an excellent flyer with your help (more about this later).
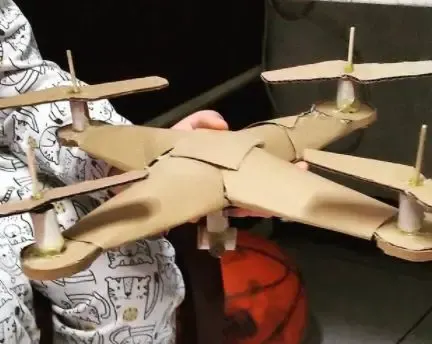
When the first prototype was finished and tested, I decided that Tinker Drone needs a complete redesign because it wasn’t that stable as I expected. So in October 2015, I started to work on the next version which is called Tinker Drone v2 (Tinker Two) (see photo below).
This drone was much better than the previous design but it still had some issues like ABS printed parts didn’t fit together properly or 3D print quality was not good enough.
So one day when Simon came over for dinner he told me about his new idea about making printed drone parts. He advised me to print Tinker Drone parts with Formlabs Form 2 stereolithography 3D printer which is much more precise compared to other 3D printers. This idea was the best thing that happened to this project because it took it to a whole new level.
I ordered several spools of Durable Resin material for my next prototype. For all those who are not familiar with this technology, I have one piece of advice – just try it! It’s amazing how easy you can to get perfect quality prints with FDM or SLA printers. After a few days, my new parts arrived and they were excellent (fit together perfectly etc). The only problem was I needed some longer bolts because Form 2 printed parts were thicker compared to other 3D printers. The only solution was that I had to order custom bolts from the local hardware store which cost me a fortune (well, not really).
About this time, I also started work on the Tinker Drone software and Simon created a website for this project – TinkerDrone.io. Pretty soon we’ll have an online shop where you can buy Tinker Drone parts 🙂 We hope that our efforts will help people to build better drones without limits! Thanks for reading and let’s start with the first step.

How To 3d Print a Drone? (cre: sculpteo)
3D printed drone Instructables (Betaflight printing)
This instructable will take you through the process of creating your very own drone.
There are two versions available for printing – one with 4 rotors, and one with 6 rotors.
If you want to build the version with 6 rotors, I highly recommend that you have a look at my article on how to calibrate your ESC’s. It’s not required, but it will make your life a lot easier when it comes time to do so.
Just keep in mind, if you don’t want to print out all of these files yourself there are kits available to get started flying quickly.
If you’ve never built a drone before, you should probably start with a quadrotor because it is by far the easiest to build. The frame for this design is very strong and vibration-resistant.
This allows your flight controller to be much more accurate. Building a hexacopter can be done if you’re interested in learning how to solder as well as fly, but I’ll leave that up to you.
For this guide, we will be building the 4 restored versions of the design because it’s easier and cheaper (by about $30) than the 6 rotor versions.
We recommend reading through all of these steps before starting any printing or soldering so that everything goes smoothly and there are no surprises along the way.
If you haven’t purchased your frame kit yet, now is the time to do it.
We have been manufacturing these frame kits for over a year and have not received a single warranty claim. They are available on our website for those that want to support us by purchasing from Amazon or Adafruit.
Order your kit now because they won’t be staying in stock for much longer! Be sure to check out some of the great builds others have done with this kit on our Facebook page.
The first thing we need to do is print all of the parts for our drone.
You can either print them with supports or rafts as needed. I highly recommend printing the plate standoffs with rafts. It’s a lot easier to separate the standoffs from the rafts than it is breaking them off of your prints. We print ours at 100% infill but you could probably get away with less.
PLA is preferred because it will bend without snapping, this makes for a better-finished product as well as saves on battery life.

Printing the frame will take about 12 hours, and then another 8 hours to print 4 motor mounts and 2 camera plates.
Printing all six motor mounts instead of just 4 takes around 16 hours total because there are three motor mounts attached together in one file that needs to be printed twice. You can choose not to use a bottom plate if you want, but we highly recommend using two so that all connections between the arms are properly reinforced.
The next step is to assemble your drone by soldering together the electronics needed.
If you haven’t ordered all of your parts yet, be sure to check out our shopping list
The first thing I recommend doing is soldering the XT60 connector onto the XT30 pigtails that come with your battery.
You can either solder them directly on or attach female bullet connectors to make it easier/safer to plug in and remove from your battery. This also allows you to use XT60 batteries if need be down the road as well as reduces resistive losses between flights because of loose bullet connectors not being tightened properly after the flight.
Connecting these wires properly will ensure that your cells are balanced correctly when charging.
Next, you will need to solder the ESC signal wires onto your flight controller’s PWM output pads.
The way this needs to be done is different depending on which flight controller you are using.
If you are unsure how to do this in detail please check out our video guide in the Multicopter Basics section of our website.
Once all of the ESC’s have been soldered, you can attach them into their respective places on your frame and plug in all 20 motors into the flight controller one at a time after binding them to make sure they are working properly before hot gluing them into place.
Don’t forget to attach your camera plates so that all 6 arms are being used equally!
The next thing you will need to do is to solder your receiver onto your flight controller. You can either solder a servo cable or balance plug, whichever you prefer.
Now that all of the electronics have been assembled, we can wire up all of the connections to our flight controller using a USB cable and a 12v power supply capable of supplying at least 3amps through the barrel connector port on the side of the board.
We recommend powering it from there rather than from one of the ESC’s because it won’t be affected by how much current is being drawn from any individual motor, allowing for more even distribution across batteries which reduces wear and tear on them as well as makes balancing cells easier if you choose to use removable battery packs in future builds.

How To 3d Print a Drone? (cre: instructables)
3D printed FPV drone a project by Michael Sorkin – The Makers Workbench
FPV, or first-person view, is a video feed from a camera on a UAV, usually displayed live to the operator’s goggles or screen.
FPV became very popular with hobbyists this past year as it allowed them to visualize their flight without having to rely solely on line-of-sight flying. In fact, many pilots now use FPV almost exclusively as they feel the experience is more enjoyable and less stressful than flying by a line of sight alone. HobbyKing even started carrying affordable FPV systems last month.
I believe that 3D printing will be integral in developing future FPV drones because you can produce one part for multiple models instead of buying numerous parts for each craft.
This will drastically reduce the cost of entry for new pilots, making it easier to spread the sport and hobby further than ever before.
The idea here is to try to build an FPV drone for as little money as possible while still maintaining a high level of performance and functionality so that other people can use these ideas if they want to build their own or just learn more about this fascinating hobby. The finished product should also look aesthetically pleasing so that you would be proud to show it off at your local field.
I will even attempt to document all my costs below so that others might see how far $250-$300 can go when building an FPV UAV with decent performance.
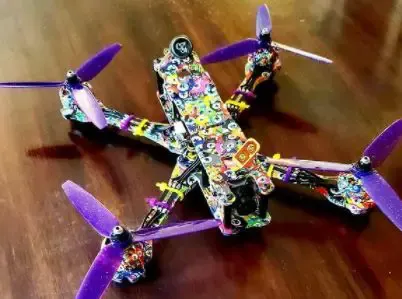
I really liked how simple and durable pjrcall’s design was so I only made minor modifications, mainly around the camera mounting point as you will see in the pictures below.
This Quadcopter should be very easy to fly and perform well, but it doesn’t have any fancy features like a GPS or return-home function – those will come next time! For now, though, take a look at what we’ve got together – I’m pretty proud of it!
Conclusion
3D printing is a process in which materials are joined together under computer control to create an object.
The printer deposits thin layers of material successively, building up the shape until it has created the desired three-dimensional objects. This technology enables designers and engineers to quickly prototype new designs or parts for clients without having to invest time in developing expensive production tooling that would be required with conventional manufacturing techniques such as injection molding.
If you’re interested in learning more about how this revolutionary CAD software can help your company save money on prototyping costs or where you can find these printers locally, reach out today!
Further Reading:
- Top 7 Best 3d Printer For Board Games
- Top 7 Best Creality 3d Printers
- 7 Best Filaments For Ender 3
- Top 7 Best 3d Printer For Nylon
- Top 7 Best 3D Printer For Cosplay Armor
Tags: #Cookie #Dice #Brass #Ceramics #Carbon #Blender #Bones #Receiver #Beyblades #Bearings #Drone
Tags: embedded youtube video, youtube video session, video session html, youtube video persistent, video persistent html, micro h-quadcopter frame, printable drone frames, drone frames making, frame model designed, foldable brushed micro-quad, comments, mm, add, reply.