“Why is my 3d printer not printing smoothly?” is a common question you may face when dealing with 3D projects. It is very normal when you often run into tough situations while using the machine. Even when you believe you set everything right, it may still refuse to work effectively at times.
To help you in setting your machine working smoothly at all times, we have collected a list of common issues you could face while operating, as well as possible solutions.
Let’s scroll down!
Related:
- When Will Full Dive VR Be Real? GUIDE TO VR TECH
- How To Get Rid Of Zits On 3d Prints? Complete Guide
- How Much Power Does A Cr 10 3d Printer Use?
- Does PLA Need a Dry Box? Using Pla In 3d Printing
Why Is My 3D Printer Not Printing Smoothly? (issues troubleshooting – make smooth surfaces)
There are a number of ways why your surfaces are not smooth. Most of them will be related to how your printer extrudes material. A single error in a 3D print is all it takes to ruin its overall quality. Here we have some common mistakes that can cause the bad texture:
1 – Ghosting or rippling
Ghosting or rippling is one of the most common problems people have when their walls aren’t smooth. This occurs when your printer moves too quickly, to the point where the vibrations created by the fast-moving, heavy pieces are too much for it to handle.
To avoid ghosting, your 3D printer should be strong and not overly heavy in the wrong spots.
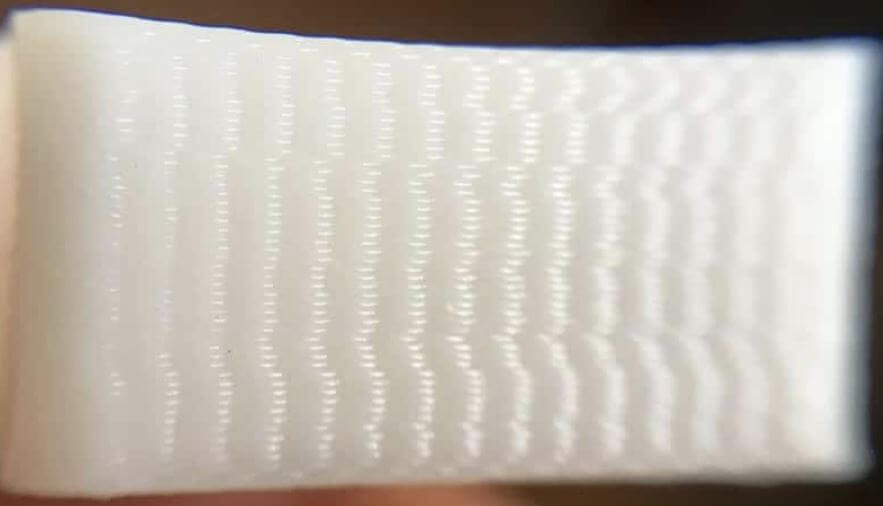
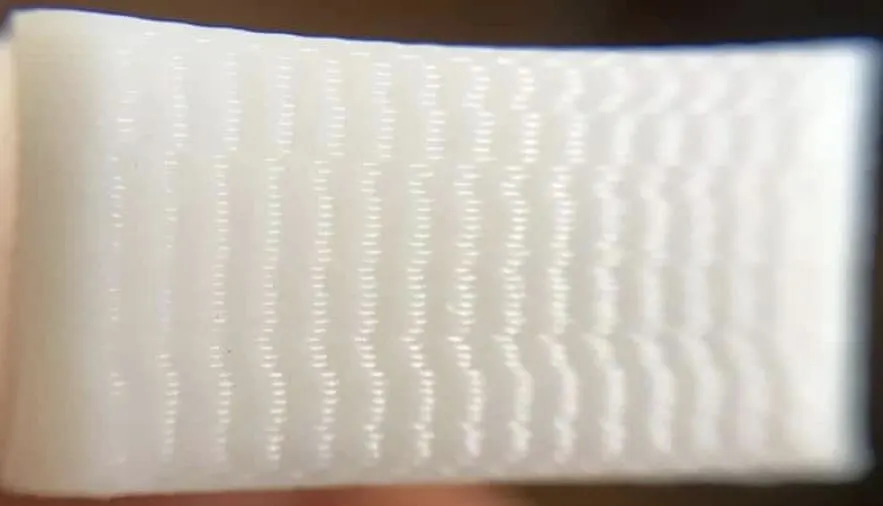
Ghosting surface zoom in (Source: 3DPrinterly)
Waves and other uneven lines occur on the print’s surface, not giving a smooth finish.
One of the issues that 3d printer companies are working hard to fix is printer vibration caused by the motor. As a result, most high-precision printers are quite heavy. The reason for this is simple: reducing vibrations by increasing the stability of its moving parts.
Weights placed in the correct positions on a moving part can help to remove instabilities. The printer is packed with these parts. Thus, if a part is loose, vibration can happen. You can avoid this problem by repairing the bolts and belts and changing those that are worn out.
One of the most important things to remember while printing is to have a sturdy table. Frail tables can help to increase the suppressed vibrations and feedback into the printer. Reduce the speed if it is too fast for your printer to handle to avoid vibrations. Check to see if the printer’s bearings and other moving parts are operating smoothly and without jerks. If this is the case, you must lubricate these parts.
Once you have fixed this problem, you will no longer see uneven and wavy lines, which cause walls to be uneven.
2 – Wrong extrusion rate (Printers make smooth)
The extrusion rate is one of the most key aspects in deciding the precision and quality of a print.
A sufficient amount of material should be extruded via the nozzle for a print to seem smooth and fine. Over-extrusion and under-extrusion are the two basic forms of these problems.
3 – Overheating the material (smooth top layer – make pla prints)

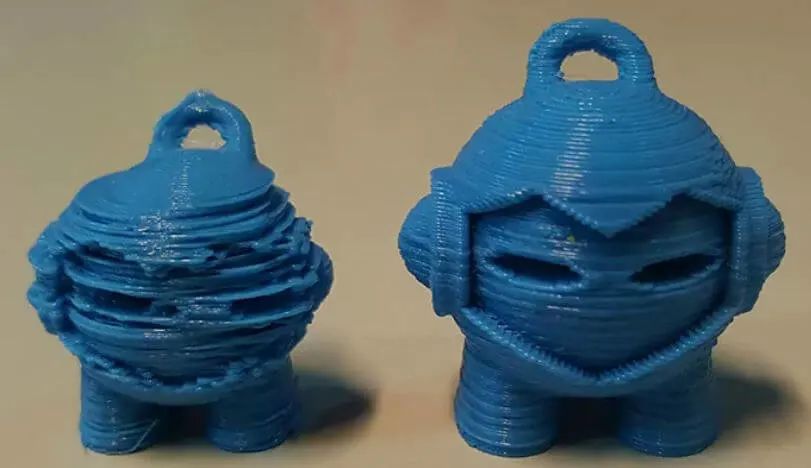
The difference between an overheating (left) and the right temperature result (Source: Gearbest)
The temperature at which the plastic exits the nozzle and the rate at which it cools are the two most important parts in leading to 3d printer not printing smoothly. Achieving the right balance between the two factors will result in a high-quality print. The printed plastic is still hot and can be shaped into other shapes until it cools. It keeps the shape you print after cooling.
It will take longer to set if the temperature is too high during the printing process. The time it takes to set will be longer if you do not cool it properly. Because hot plastic has a tendency to flow, a longer setting period is enough to cause small deformations.
This will very certainly cause the print model to lose smoothness. In the event of printing smaller models, it is more clear. It is because smaller models take less time to print each of its layers, resulting in the new layer on top of a wrongly placed one.
Lower the print temperature, increase the cooling rate (raise the fan speed), or reduce the printing speed to give it time to set are some popular strategies to minimize overheating.
Keep in mind that different materials need different levels of cooling and setting times, so you will need to check these ones if you change filaments. Smooth walls and high-quality PLA frequently need the right level of cooling.
ABS, on the other hand, is sensitive to heat changes. So cooling must be below, as well as a relatively consistent printing temperature. These settings differ from brand to material or even printer.
4 – Ironing the surface (isopropyl smooth pla)
This is a function that is only available in a few 3D printers. This mode involves moving a slightly hot print head over the completed object to reheat the plastic and realign any flaws, resulting in a smooth surface. Moreover, this process can leave small pieces of plastic on your object.
Tips To Improve The Quality Of Your Result (
1 – Change the bed and nozzle height
When you get a new printer, the first thing to do is make sure the bed is properly leveled. It’s important to have a strong first layer because the rest of the layers are affected by the first layer’s printing.
Of course, after the first 5 to 10 layers, the remaining layers recover and print better, but take your time while leveling the bed and dialing in the first level.
Making sure the bed is aligned and the nozzle distance is properly fixed is the simplest way to improve 3D print quality. A recommended distance between the bed and the nozzle is included with most printers.
Setting this distance can be done with a feeler gauge or a simple piece of paper. The gauge or paper should slide under the nozzle after it is properly positioned. It does not take much push to get it to go underneath the nozzle. To ensure that the process is working well, it should be repeated at least three times.
2 – Check the print head’s temperature
If the temperature is too high, filament strings will form between the spaced parts. High temperatures often melt the top layers of tall parts, warping the final object. Add a one-centimeter cube on the opposite side of the build plate to remove the hot nozzle from the item if you are making a bigger thing. The head will cool as a result of this.
Consider using a shield structure or a wall if the strings form between structures. Typically, we find these features in slicing programs.
3 – Use different building plates
Different build plates give the object different textures. PEI, glass, and magnetic are common bed materials that leave a flat surface. We can achieve a matte finish by using painter’s tape or plastic sheets.
Use only enough glue or spray to cover the plate if you’re going to use it. Using too much glue or paint causes the object to distort and develop dents. These make removing the object from the plate difficult, and pushing it off can harm the object and break the plate.
Experiment and play around to find the best way to create a surface finish that fits the object.
4 – Focus on adjustment and maintenance


Every 3D printer includes features and ways for improving print quality. In order to achieve the best output, printers must be well-maintained. The printer’s rails, for example, need to be cleaned and maintained.
If your printer uses stepper motors, the gantry should be the same height on both sides. Check to see if the frame has any weak points as well. Tighten all bolts and make sure the firmware is up to date according to the manufacturer’s instructions.
Echoes or ringing around the edges of features will affect the quality of your finished output. Vibrations from the extruder’s operation generally produce these distracting lines and cause 3d printer not printing smoothly. Reduce the printing speed to solve the problem. Make sure the extruder has enough room to move around so the printed area does not overheat or cause other issues.
5 – Store the filament carefully (printed)
The most of filament is hydrophilic, meaning it absorbs water from the air. This causes printing issues. Water turns to steam and escapes from the plastic during extrusion, causing damp filaments to stretch. As the steam departs, the filament often crackles or breaks. It is also possible that there will be smoke.
You can dry the filament on the spool in the oven at low heat for a few hours. Some people construct a heated bin in which the filament is stored before being fed into the printer.
How to store your filaments: (104) 3D Printer Filament Storage Options and Why They Are Needed
6 – Get a slicer
Adjust the slicer’s hyper or fine quality setting if a print is not as good as you want. While the working process will take longer, the quality will improve. However, after a few low-quality ones, do not change the slicer.
Check the issue and make modest changes to the settings. Continue printing as you adjust the parameters to see if anything has changed. Slicers come with a variety of options. Spend some time learning how to use them so that you can get a better finish.
Last but not least, do not forget the post process. After you get the object you want, spend some time checking it for any mistakes. For example, you can remove small flaws by using sandpaper or a small sharp knife. In addition, you can try to use the chemical smoothing method. However, it is quite toxic, so you must be very careful.
Why Is My 3D Printer Not Printing Smoothly?: Frequently Asked Questions

1 – How Tight Should The Belts Be?
The best way to check that your 3D printer belts are correctly tensioned is to tighten them until they have no slack and are resistant to being pushed down. It should be about the same tension as a stretched rubber band, but do not overtighten your belts because this will cause them to wear out faster.
2 – Why Does My 3D Printer Stops Mid Print?
There are a lot of reasons why a 3D printer pauses mid-print, thermal cut-offs, power issues, filament issues, a clogged nozzle, or a pause command are some causes. If the temperature rises too high, your extruder will shut off as well. Turning it off and allowing the machine to cool down is the only way to fix this problem. Add an extra cooling fan to entirely remove the problem.
3 – Can You Smooth PLA?
Polishing your prints is a simple task. Apply a small amount of liquid polish on a soft cotton cloth. Then rub the polish into the surface of your 3D print in small circles until it completely absorbs. When you complete the task, the finished surface should be reasonably shiny.
4 – What Causes Ripples?
A lot of things can cause ripples on the first layer of a print. They may be incorrect first layer height or flow, the nozzle being too close to the printing bed, uneven bed leveling, too fast printing speed, or leaving the layer fan on during the first layers.
5 – What Causes Gaps?
If your print speed is too fast, gaps may appear. As a result, your printer may fail to extrude filament in a shorter amount of time. If your 3D printer extrudes and speeds at the same time, it can extrude thinner layers first, then normal layers when it decelerates.
Conclusion
It might be hard to use 3D printers sometimes. That is because there are a lot of issues that arise as soon as you turn on it. Most of the time, fixing common 3D printer issues is easy. In fact, changing the settings on your machine’s software can almost instantly fix most problems. However, in case of a mechanical breakdown, it is best to ask for help from the manufacturer’s customer service.
In summary, the reasons why 3d printer not printing smoothly mostly depend on how you set up your machine. We hope our article helped you in some ways!
Further Reading:
- Best Creality 3d Printer– How To Choose The Best One?
- Best Filament For Ender 3
- Top 6 Best 3D Printer For Cosplay Armor
- Best 3d Printer For Board Games
- Best Filament For Lithophanes: What To Use
- Top 7 Best Dual Extruder 3d Printer Under $500
Tags: troubleshooting, to identify over-extrusion or under-extrusion, change extrusion temperature, smooth top layer, heated print bed, fix resin prints, print bed solution, printer printing walls, make pla prints, make smooth surfaces, isopropyl smooth pla, printers make smooth, read, symptom, suggested, signs, deposited, back, step, fans, infill, print bed